

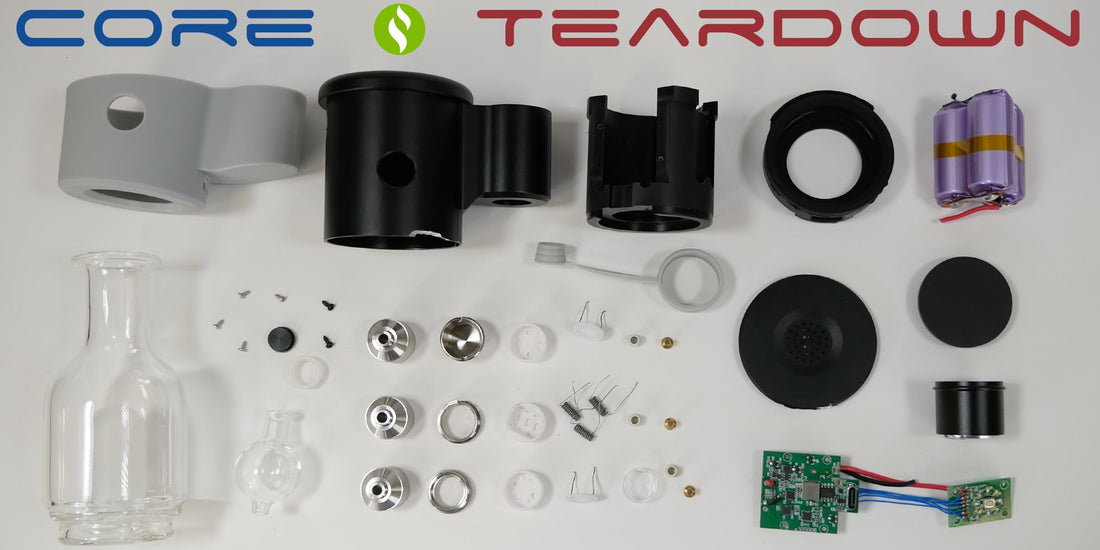
SZ Crossing Core E-Rig Teardown

The Core Teardown
E-rigs are all the rage.
It wasn't too long ago that your options were either a pen or a rig that is too big to carry.
Both are great options however if you wanted a rig that was portable and vaped like a beast you were out of luck.
Then came the E-rigs. The concept is simple enough. Stronger atomizers than what you would expect from traditional pens and water filtration so you can take those monster draws.
Ok great, E-rigs are a lot of fun. Which ones can we trust?
Just like buying a car, you have to look under the hood to really know what is going on.
So let's do it.

SZ Crossing
This is a company that already has a reputation for making some of the best liquid pens. The Sai for example has been our most popular concentrate vaporizer for years.
We were excited to hear about them working on a E-rig.

Glass top piece
This piece holds a small amount of water, up to 2 ounces. It works best with about an ounce of water.
We can't do much to teardown this piece unless we hit it with a hammer...


Around the atomizer
The atomizer shield has no threads. What a good idea! This part screws in on some e-rigs. When your rig is excessively dirty it can be a real pain to unscrew these parts.

The Shell
The shell has a silicone covering that makes it easy to grip.
Under that cover you have an aluminum shell that is anodized black.

We do these teardowns "blind" which means we do not ask the manufacturer for any help with the disassembly. Then we follow up with questions afterwards.
This is done to avoid bias.
However we are usually guessing how it comes apart.
On the back of the shell there are two screws, that seems like a good place to start...

OK that didn't accomplish much.
Pressure fitting parts is becoming more common and it looks like there might be a cap on the bottom of the Core

Yup, a pressure fitted cap
It wasn't easy to get this part off, we used a dremel to release some of the pressure then pry it open.

Looks like we are starting with the battery

The Core Battery
The battery is a 3150 mAh 3.7v triple 18390 battery pack.

There is an interesting cap on top of the shell and one below the atomizer. It looks like parts would not fit through these, our guess is these are here to help with the assembly process.
That chassis doesn't want to come out though...

Ah, the button screws into the chassis holding it into place.


Circuitry keeps getting smaller and smaller.
On the right you have your power button which is surrounded by an array of LED lights.
The board on your left has your USB-C and the brains of this operation.

And on the back a few more chips and the haptic sensor.

The silicone gasket was pressure fitted into place, this is the part that holds the glass to the rig.
It looks like there is another pressure fitted ring on the top of the outer shell.

Family photo.

Core Atomizers
This is what we are most interested about.
Most E-rig atomizers have an exposed ceramic plate that is covered by a metal sleeve.
SZ Crossing has always set the example for proper atomizer use.

We are not just looking for what is in this atomizer, we are also looking for what isn't in it.
Like most coils there is a silicone gasket and metal plug on the bottom that hold the wires in place so they connect to the base properly.
The triple ceramic rods are wrapped with grade 2 titanium wire.
These coils are housed in a small ceramic dish and are pressure fitted into the shell.

Ok quartz bucket, your turn

This atomizer can be rebuilt so it is a lot easier to take apart than the triple ceramic coil.
The concept is similar however in this design you have a large ceramic plate that sits under a quartz glass bucket.
Bucket atomizers in general are considered the best example of practice.
Ceramic rod's work great and we have no reason to question their integrity (as long as proper materials are used) however we like to see heating elements isolated from the airpath whenever possible.

Let's take a look at the back of that ceramic plate.
The heating coil is inside the ceramic.
The titanium wires are wielded into place. Typically this is done with silver.
On the left wire there is a small piece of insulation.
This is a common part we see all the time. In most situations this part doesn't cause any problems. We have seen examples in the past where the insulation is too close to the heating coil and burns.
In this coil the insulation was placed under the ceramic housing, creating a barrier.
Also this part is underneath your bucket, away from the airpath.
The more an airpath is isolated, the better.

The Core Titanium Bucket

The concept is basically the same as the quartz bucket with a titanium bucket instead.

Conclusion
It wasn't too long ago that we would pull a vaporizer apart and it would be filled with improperly used materials. And if you wanted an isolated airpath, forget about it.
We already know SZ has a reputation for making some of the best built products. In our opinion, the core is setting an example for all other E-rigs to follow.
Pre built coils like the titanium and quartz bucket, where the heating coil is isolated from the airpath, is exactly what we want to see.
We do these teardowns to start a conversation about product quality.
Let's talk about this together.
If you have questions that we didn't answer please ask in the comments. We are happy to dig up as much information as we can about Core or any other vaporizer.
The Core E-rig is available here
A full review of the Core is here
You can join us on Instagram and talk to us anytime here
As always, thanks for being part of this discussion with us :-D
Most Popular E-rigs Available
3 comments
There is no mention about the o-ring that seals the atomizer shield….anyone know the size of the orings? The rig comes with 2 replacements but I need more. Thanks
@Lou Heyo! Any 25mm carb cap will work great, though we recommend one with a short airflow nub, or without one entirely like the stock carb cap’s design. Try some out and see what you like best! =)
The carb cap appears to be standard size. Will any carb cap be a suitable replacement?