

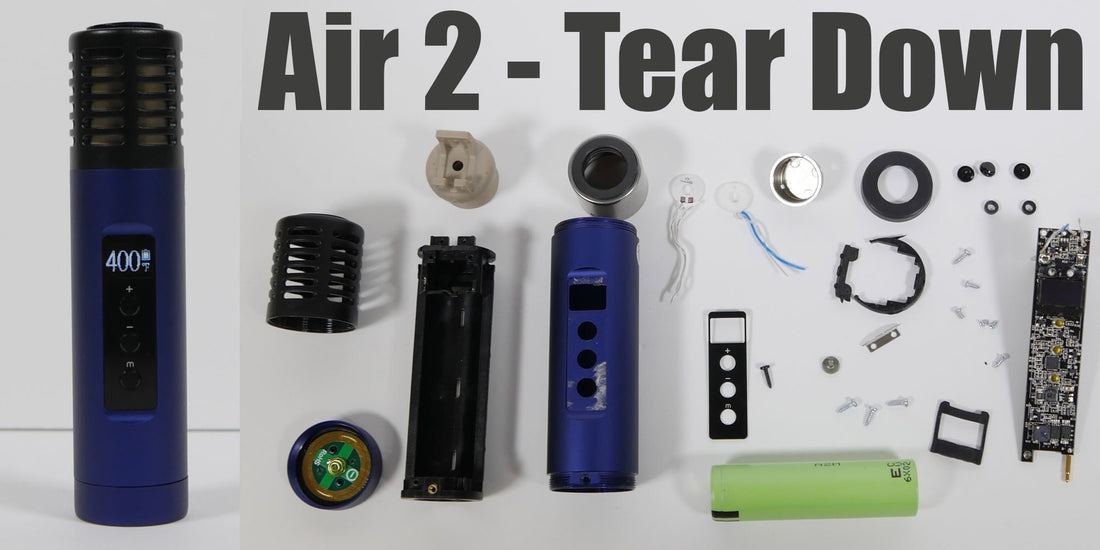
Arizer Air 2 Teardown and Disassembly
Arizer AIR 2 Disassembled - breaking vapes down and gettin' all up in there!
Arizer is one of the most trusted names in the vaporizer industry and their vapes are known for top tier build quality and performance. Their first portable on the scene was the Arizer Solo which quickly gained a huge following for being one of the first pocket vapes capable of producing clouds on par with desktop vaporizers. A couple years after the Solo's release the Arizer Air was created to provide the same thick, flavorful vapor in a slimmer and more pocket friendly form. Arizer dropped the Solo 2 and Air 2, upgraded models with improved battery life, quicker heat up times and LED displays with full single digit temperature control. This Summer we did a full teardown of the Solo II and now the Air II is getting the same treatment.
Reminder: Disassembling your vape will void the warranty, do not follow along with us.

Cap and Battery Removal

New Screen and Controls

Heater Cover Removal

Chassis Removal, Heater Detachment

Circuit Board Front and LED Screen

Circuit Board Back and USB Port
On the back of the Air II's primary circuit board you can see the Micro-USB connection. The USB port is on a secondary PCB connected to the main circuit board. A strip of padding acts as a protective cushion between the circuit board and the electronics enclosure sleeve.

Heating Chamber Removal

Heating Element

Heating Element Disassembly
With the heavy duty screw and retaining plate removed we now have access to the good stuff. The ceramic ring on the right with the thicker blue wire is the heating element. The ceramic disc on the left is the temperature sensor. A small piece of thermal putty cushions the temperature gauge's connections and shields them from the heating plate. The heater assembly has the retaining plate on the bottom with the temperature sensor on top and the heater sandwiched directly between the temp sensor and the heating chamber base. The heating disc raises the temperature of the entire stainless steel oven section which in turn heats the material loaded in your mouthpiece.

Different Generations, Different Chambers
The Arizer Air's heating chamber has evolved quite a bit over time for the sake of more open airflow. The chamber on the far left was the original release with four small air jets. The middle chamber with the expanded air wells was released in 2016. The grooves surrounding each air hole ensures the mouthpiece can't sit flat against the base of the chamber and obscure the jets. On the right is the Air 2's heating chamber with air wells and expanded air jets which provide a noticeable improvement in flow. A thin layer of high temperature thermal paste helps heat transfer more efficiently between the ceramic heating disc and the base of the steel chamber similar to the thermal paste between a CPU and heat-sink in a computer.
Closing Thoughts
The build quality and materials used in the Air II are very sturdy and high quality which is to be expected from Arizer. The heating design is simple but gets incredible results; thick clouds and better flavor than most any other conduction vape due to the material being enclosed in the glass mouthpiece rather than making direct contact with the hot chamber. We're huge fans of the entire Arizer lineup and recommend them nearly daily. If you'd like to grab one for yourself give these links a click: AIR 2, AIR, Solo 2, Solo, Extreme Q, V-Tower
If you liked or disliked our Arizer Air II tear down please leave a comment below to let us know. Hit up our Reddit, Instagram or Youtube pages for more vape content and keep an eye on Our Blog for a BIG upcoming sale!
5 comments
what kind of metal is the removal heater cover?
@Steve Heyo! The Air 2’s airflow comes from around the black shroud on the top of the device. In the second photo of the blog you can see a silver heater cover – the air goes under that section, then up under the holes in the oven and into your mouthpiece! Lemme know if that helps! =D
Hello I’m also wondering about airpath, like Curious One. I know the electronics are isolated and all – but I can’t tell from the disassembled parts how the outside air goes through the unit. Looks like the stainless steel oven is sealed inside the beige piece but I know it’s not! How does air get to those four holes in the oven?
@Curious One The Air 2 uses an isolated vapor path from the oven to your lips; the air itself is room temperature until it reaches the oven, then travels through the glass vapor path to your lungs! =)
This is a great post to see the inside of the Air 2 – many thanks for doing this! I am curious about one aspect, and I cannot tell from the pictures no matter how much I try: What is the airflow pattern inside? More specifically, how does the air get to the air jets inside? Thanks.